Friday, March 20, 2015

Happy First Day of Spring!!

Ironically, today is a dreary, cold, and rainy day... The temperature is a balmy 45 degrees on the first day of spring. :( So... I'm happy to be creating such beautiful bright and colorful flowers in a few of my classes this week.  It definitely has brightened up my morning!  We added polka dots to the background of these and I love the striking effect of them!


This student asked if he could do his in shades of black, white, and gray.  It turned out awesome!


Happy Spring!


Monday, March 16, 2015

More Georgia O'Keefe inspired paintings! :)

5th grade is finishing these gorgeous spring flowers this week.  This class had a LOT of purple and orange and blue color combinations!  I love this yellow and blue one!


Monday, March 9, 2015

Cosmos!

Finishing up spring projects this week, starting with 1st grade and these larger-than-life flowers!  I found them here and she has shared an awesome tutorial for them!  Although I didn't exactly follow it.  Probably would have been easier!  :)  We discussed Georgia O'Keefe and her beautifully detailed flowers while we worked on this project. I can't wait to decorate the hallways with these!


Friday, February 13, 2015

Happy Valentine's Day!

Valentine's Day is one of my favorite holidays, I'm not sure why, maybe it's all the red and pink!  I've always loved it and now with my own children we always make a big deal of Valentine's Day every year.  My students are working on these nifty looking abstract hearts this week.  I've done so many variations of this project, but it's a great quick, yet neat looking design that I always fall back on!


My usual variation for older students involves patterns!


Sunday, February 8, 2015

Penguins sliding down the hill!

Kindergarten created these adorable penguins over the last few weeks.  This was a fantastic lesson for teaching depth.  I simplified it a little by giving them 3 different sized ovals for each of the penguins.  We added the details, colored the beak and feet, painted them black and lastly painted the sky and a light shadow underneath.  


Birch trees, 3rd grade

This was an easy and such a neat looking project to complete!  I found a similar design on Pinterest.  We painted our background on the first day, traced and painted our trees white on the second, and on the last day we added the details in black paint.  I love these!

Watercolor winter wonderland, 5th grade

Over the years I've done this project, I think I've finally figured out how to get students to make horizontal lines in the water.  I have them hold their brushes at a 45 degree angle and pretend it's in a vice, unable to move.  They can go side to side and up or down, but they have to move their entire arm so it reminds them to keep their lines horizontal.  The water in this year's project looked much better!

Wednesday, February 4, 2015

Snowy evergreen trees

4th grade learned about layering and overlapping in these snowy scenes, and I love how the sky turned out in several of them!


Wednesday, January 28, 2015

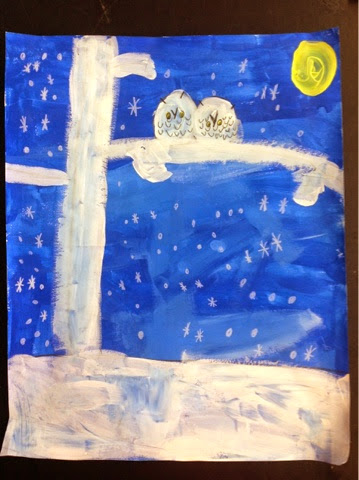
Snowy owls

As we are wrapping up some of our winter projects this week, I can't help but to wish for some snow to go along with them!  I know they're getting a ton of it in the Northeast this week, so maybe they can share a little with us? :) It doesn't snow often here in the south, but when it does, it's like Christmas all over again!  At least for me it is!  Here are a few of the snowy owl trees 1st grade is finishing this week. I found this one on Pinterest a couple of years ago and I was happy to try them this year!


Monday, January 5, 2015

Lantern instructions!!

Before Christmas break I sent my 4th graders home with a little homework task.  
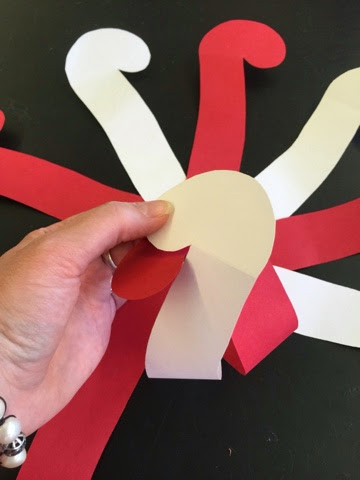
They cut the pieces for this lantern out during class but we ran out of time to finish, so I gave them a little challenge... To finish it at home and bring it back for a prize! I had some students finish it at school but if you haven't quite gotten it, hopefully these step by step photos will help!  Remember you need 10 strips to put it together... 


Start by interlocking the top of two strips..


Continue this pattern...


...alternating colors as you choose until you get them all in place.  Then evenly space them out.


Then carefully flip the entire thing over...

 Pull one piece up to the middle...

...and interlock the next strip into the first...

Continue this pattern, one strip beside the next until all pieces are interlocked into a peppermint swirl pattern like the bottom of the lantern.


If all the pieces are put together correctly, it should stay together when you're finished! :)